|
I have also found that the resulting images have a wider field of view with some of my old lenses: Lumix 14mm and Lumix 14-45mm. The resulting DNG files look nicer than those obtained with Lightroom: better clarity, sharpness, vignetting correction, etc. I like the lens correction applied to RAW files. Not sure what adjustments are available in PureRAW but I generally take the sharpness setting down a bit (to around -.75) as I found the default results in a slightly oversharpened image with Panasonic RAWs. I use Photolab 4 which has the same DeepPRIME denoiser and it produces excellent results on my G85 with any combination of lenses. I have found it didn't create a good image for the E-M1III-Oly 8mm f1.8 fisheye combination, but tests with other primes on 2 different MFT cameras resulted in excellent results. It automatically produces a DNG with lens correction and noise elimination ready for your favorite software (or a JPG, if you prefer). MFT photographers shooting RAW should take a test run with the new app from DxO - DxO PureRAW.
0 Comments
.jpg "how to find wifi password on android")
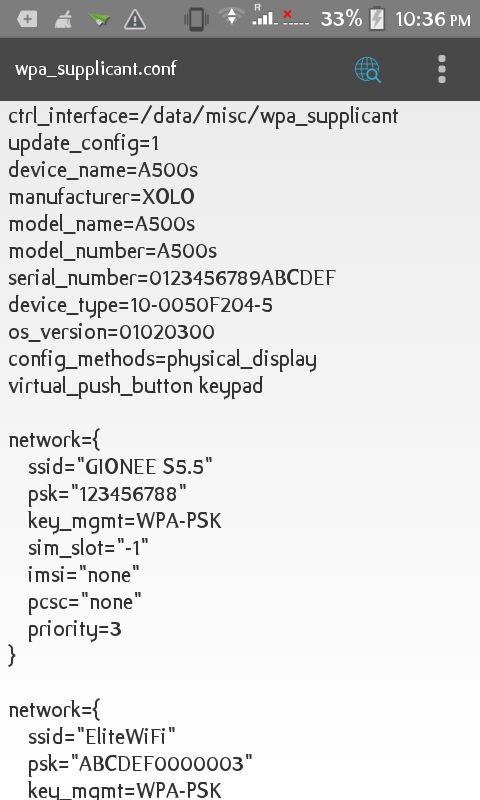
Step 1Īfter tapping on the QR Code option in Samsung and tapping on the network ID in Xiaomi phones, take a screenshot of the screen where QR Code is being shown. Before following these steps, make sure you have Google Lens installed. Tap the gear icon next to your Wi-Fi network. You can also type Wi-Fi into the Settings search field. Depending on your phone, you may need to navigate to Settings > Network & internet, Settings > Wi-Fi, or something similar. However, if you are using these company’s devices and want to check the password of the Wi-Fi in plain text, the below steps should be followed due to the fact that the Samsung and Xiaomi phones only show the QR Code for sharing the Wi-Fi and not the exact password in plain text. Here’s how to see a Wi-Fi password on Android: Open Settings, and tap Network & internet. If you are a non-Samsung or non-Xiaomi user, the above steps should suffice. 
Read More: How is ChatGPT trained? For Samsung & Xiaomi users: Users who want to connect to the network can scan the QR code or directly enter the shown password. This was how you can check the Wi-Fi password on Android smartphones. Now, the device will show you a QR Code and the password of the connected Wi-Fi network in plain text below it. 
Now, for non-Samsung users, you will have to verify it by entering your password or authenticating your fingerprint so no one can misuse the feature. However, if you are using a Samsung Android smartphone, tap on the QR Code button at the bottom. Next, tap on the ‘Share’ button if you are a Pixel or OnePlus/Oppo/Realme/Vivo user. Tap on the gear icon or the “i” button next to the Wi-Fi you are connected to. Alternatively, you can tap and hold on to the Wi-Fi button in the Quick Settings shade to directly go to the Wi-Fi page. Go to Settings > Network and Internet > Wi-Fi Tap the Wi-Fi network you want to find the password There are two options in blue, 'Forget' and 'Share'. It is situated under Network settings or Connections, depending on which company’s device you have. Head over to the settings of your Android smartphone and go to the Wi-Fi section. So let’s take a look at how you can do that. For instance, if you are connected to a Wi-Fi network which has a long and complicated password, or maybe if you have forgotten the password for the network, you can easily check it from settings and even share it with someone without a lot of effort. Android smartphones are a versatile breed of devices that offer a bunch of features and one such feature they offer is the ability to share WiFi passwords. Select the Overlay clips in the Timeline and tap the Swap button in the Viewer. You can swap the images in your Split Screen left, right, top, and bottom. You should now see your images in a Split Screen view. Open your iMovie Project for editing on iPad and follow these steps to create the Split Screen effect: Add Split Screenġ) In your movie Timeline, select the first clip that you want in the Split Screen.Ģ) Tap the plus sign to add the second one you want in the Split Screen.ģ) Select the image and tap the More (three-dot icon) button. Use a Split Screen in iMovie on iPhone and iPad In the Overlay settings of the Viewer, move the Slide slider, which is set at zero by default, to set the duration of the transition. You can have a brief transition from the first to the second image if you like. Pick from left, right, top, or bottom to rearrange your images. If you’d like to change the layout, just click the Position drop-down menu in the Overlay settings of the Viewer. Open your iMovie Project for editing on your Mac and follow these steps to create the Split Screen effect: Add Split Screenġ) Go down to your movie Timeline and select the first clip that you want in the Split Screen.Ģ) Drag that clip to the top of the second one you want in the Split Screen and release.ģ) Click the Overlay Settings button at the top of the Viewer.Ĥ) In the drop-down on the left, select Split Screen. If you haven’t tried this yet, here’s how to create a Split Screen effect in iMovie on macOS, iPadOS, and iOS. The images can be next to each other or on Mac, shown on the top and bottom.  
This lets you display two images on the screen at the same time. 
One neat effect that you might want to try is a Split Screen. Whether you’re using an existing video or arranging photos, you can tell any type of story with visuals and audio. You can create some pretty cool movies using iMovie on Mac, iPad, and iPhone. 
Fitbit has also overhauled the strap mechanism on the Versa 3 and now all you have to do to swap out bands is press a button. In theory, this works exactly like a real button, but the haptic feedback is nowhere near as satisfying as pressing a real button and it takes some getting used to.įortunately, not all the design changes have a learning curve. Instead of a physical button on the side of the watch like its predecessors, the Versa 3 now has an indented haptic side button. The Versa 3 lags a bit between swipes and takes a while to load apps and display information. 
And since Fitbit supports third-party watch faces, you have hundreds of different options to choose from.ĭespite its aesthetic improvements, the touchscreen and Fitbit interface still aren't as responsive as what you'd get on an Apple Watch or Galaxy Watch, which also have AMOLED screens. It can stay always-on (as a toned-down version with fewer metrics displayed) to give you a quick glance at the time without moving your wrist. 
It's bright, crisp and easy to see in direct sunlight. The Versa 3 still has the same square-ish watch body and metal frame as its predecessor the Versa 2, but it now has a larger 1.58-inch AMOLED screen with slimmer bezels. As an added bonus, the Versa 3 costs $100 less than the Sense. While you don't get the stress tracker and FDA-cleared electrocardiogram (ECG or EKG) like the Sense, the rest of the Versa 3's smartwatch and fitness features are similar. With an always-on display, built-in GPS, blood oxygen and temperature tracking during sleep, and a battery that lasts six days, the Versa 3 holds its own against some of its pricier competitors like the Apple Watch SE and even the Fitbit Sense. The Fitbit Versa 3 is Fitbit's best smartwatch for most people.   
Some people are overwhelmed with what Windows OSs offer. This exciting feature is a lifesaver, and it’s a surprise that Microsoft doesn’t enable it by default. For instance, it allows you to disable download blocking and skip rebooting after updating.Ī great addition to Windows’ abilities is that you can activate the recycle bin for removable devices such as a USB drive. However, there are specific items to improve your Windows experience in clever ways. Many usability improvementsĪll tweaks from Winaero Tweaker, including the more graphics-related ones, improve Windows usability to some extent. It’s now in GB instead of KB, which has been an annoyance for users over the last two decades. It also makes changes to the RAM display. That's assuming you bought the Wrath Prism brand new (whether by buying a CPU that came with it, or buying the cooler separately as new). Speaking of thermal paste, there is no need to apply thermal paste yourself when it comes to installing stock AMD coolers such as the Wraith Prism as they already come with thermal paste pre-applied to the bottom. Use a lint-free cloth and isopropyl alcohol if you need to wipe off any thermal paste residue from the previous cooler. If you're installing the Wraith Prism cooler into an existing system, and you previously removed the old CPU cooler, you want to make sure the top of the CPU is clean of any old thermal paste (or general dust and debris). 
See how to install a CPU step by step if you need help with that. Also make sure the small retention arm on the socket is down and locked into place. Ensure CPU is Installed Properly (and Top is Clean)īefore installing any CPU cooler, make sure your CPU is properly seated in the motherboard's CPU socket. See Also: How to Install the Wraith Stealthġ. Installation of a Wraith Prism is straightforward, and does not take long, but if you want all of the steps explained in more detail than what is presented in your AMD manual, and with photos, this tutorial is here to help.īefore going ahead with the Wraith Prism installation steps below, make sure you're aware of basic safety precautions when working with PC components such as grounding yourself by touching metal before handling any internal hardware (explained in our full guide to building a PC from scratch ). 
Learn how to install the Wraith Prism RGB LED cooler, which is the AMD stock cooler that comes shipped with some modern AMD processors (see the FAQ at the end of this article for a list of models that come with the Wraith Prism). 
Yet some users have continued to report that the version number of their iMac17,1 firmware has remained stuck at 170.0.0.0.įollowing that last update, I asked you to let me know the current firmware version of any iMac17,1 which had been updated to 10.15.4, or using Security Updates 2020-002 containing the same firmware update. There have been at least two further firmware updates for that model since, with 10.15.3 (and Security Updates) taking it to 175.0.0.0, and 10.15.4 (and Security Updates) on to 176.0.0.0. Readers here reported this problem, and I posted an article which questioned what was going on. Those iMacs should have been updated from version 170.0.0.0 to 173.0.0.0 when upgraded to Catalina, or with the matching Security Update for those which remained on High Sierra or Mojave. Since the release of the first version of Catalina six months ago, one particular model has resulted in a worryingly high failure rate in firmware updates: the iMac Retina 5K 27-inch Late 2015 (iMac17,1). It’s not as convenient, perhaps, as being able to run a separate firmware installer, but works. 
When this happens once, it’s no great disaster, and applying the update a second time – perhaps in the ‘Combo’ updater – often does the trick. Occasionally, though, updaters don’t install the firmware updates they’re expected to. You let Software Update download and install macOS updates, and whenever new firmware is released for your particular model, that gets updated too. When everything works well, you shouldn’t have to worry about any of this. Old versions can have incompatibilities with more recent releases of macOS (or Security Updates), and may contain security vulnerabilities and other bugs. Keeping your Mac’s firmware up to date is important. Each such update now comes with installers for the current release versions of firmware, which are different for various models of Mac. For some years now, the only way that your Mac can update its firmware is when you install a macOS update – which includes both updates to macOS as a whole, and Security Updates for previous major releases of macOS. 
Write on a PDF with highlight and underline text, as well as other annotations. In addition, you can fill in PDF forms with the PDF editor for Android free. You can regard this application as your PDF reader, PDF annotator, PDF manager and more. You can scan, read, annotate, sign, sync and share PDFs with ease. Xodo PDF Reader & Editor apk is one of the full-featured free PDF editor apps for Android. Part1: Top 10 Best Free PDF Editor APPs for Android Top 1: Xodo PDF Reader & Editor 
More Reading: AnyMP4 PDF Converter Ultimate: Convert PDF to Editing Text File.Part 2: Top 5 Best Free PDF Editor APPs for iPhone/iPad to Edit PDF Files. 
 
Think a photo needs some tweaking? Try out filters like Cali, Festive or Epic. Once the photo is uploaded, you can access and use it anytime! Or, browse through Canva's incredible image library which contains more than a million professionally-shot stock images, illustrations and graphics. For businesses and brands, you can upload your logo and use it to create a wallpaper for company-issued devices. Want to be greeted by your favorite band, celebrity, or pictures of family and friends the moment you log in? Or maybe you want to see your favorite selfie on your screen - because why not? Just drag and drop your photo and Canva will upload and save it for you. 
Plus, you can access your design anytime on your computer, iPad and iPhone. It's easy and fun to make wallpapers for any device through Canva's collection of wallpaper templates and suite of editing tools. Enough of the generic peaceful landscape, swirling galaxies, or abstract geometric patterns! Jazz up your computer, phone or tablet by creating a wallpaper design unique to your taste and style. 
There is another option to install PowerShell over the network which is especially useful for sysadmins.ĭownload PowerShell 7.1.3 (Install And Upgrade Guide)Download and install PowerShell 7.1.1 for Windows 10Download And Install PowerShell 7.2.4 And 7.0.11 (LTS)Download And Install PowerShell 7.2.6 (Offline Installers)Download And Install PowerShell 7.2.7 and 7.0. This will automatically install PowerShell 7.1 with default options. We certify that this program is clean of viruses, malware and trojans. msi file and follow the straightforward directions to install PowerShell 7. msi file, be sure to download the stable release. Note that separate files are available for both 32-bit and 64-bit. Step 1: Visit this page of GitHub and get the. 
You can also install PowerShell 7.1 using command-line. Windows PowerShell Download Free Desktop Enhancement Software Open source and GPL software Controlling Software We have tested Windows PowerShell 7.3.3 against malware with several different programs. How to install PowerShell 7 in Windows 10. NET InteractiveExperimental work on proxying native commands like kubectl How to install PowerShell 7.1 in Windows 10 # The SecretManagement and SecretStore modules for universally accessing and managing secrets across platformsPowerShellGet 3.0, a complete rewrite of PowerShell’s module package manager, includes a brand new set of parameter sets that conform to modern package manager semanticsThe latest PSReadline beta with support for Predictive IntelliSenseSupport for both PowerShell Notebooks in Visual Studio Code and PowerShell Notebooks in. This is not a major update but it still comes with a good number of improvements and fixes.Ĭhanges made in PowerShell 7.1 include the following:  
Powershell_7.1.0-1.ubuntu.18.04_bįor more download options, please checkout this download page. Download PowerShell 7.1 # For Windows 10, Windows 8.1 and Windows 7 # You can run commands as well as complete automation scripts called cmdlets in PowerShell. PowerShell is a command-line automation tool just like DOS Command Prompt, only better. You can check out the difference between PowerShell and PowerShell Core. PowerShell 7.1 is an update to the major version PowerShell 7. |
AuthorWrite something about yourself. No need to be fancy, just an overview. ArchivesCategories |
 RSS Feed
